Table Of Content1
Adobe Photoshop CS
Retouching Tips: Enhancing Eyes, Eyelashes,
and More!
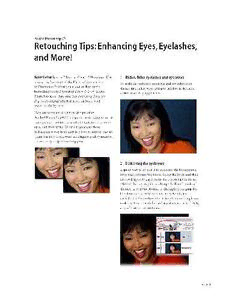
Scott Kelby. Scott is Editor-in-Chief of Photoshop User 1. Richer, fuller eyelashes and eyebrows.
magazine, President of the National Association
To make the subject’s eyebrows and eyelashes look
of Photoshop Professionals, and author of the
thicker and fuller, we’re going to need to make them
bestselling books Photoshop Down & Dirty Tricks,
darker than they appear here.
Photoshop Killer Tips, and The Photoshop Book for
Digital Photographers. For more on Scott, visit
www.scottkelby.com.
Here are some amazingly quick tips using
Adobe® Photoshop® CS for quickly enhancing what are
perhaps the most important facial features: a person’s
eyes, and their smile. What’s great about these
techniques is they’re so easy to perform, anyone can do
them, but they’re the same techniques used by many of
the industry’s top retouching pros.
2. Darkening the eyebrows.
A quick way to do this is to duplicate the background
layer that contains the photo. Select the layer, and then
choose Duplicate Layer from the Layers Palette menu.
Then in the Layers palette, change the blend mode of
the new layer from Normal to Multiply. Changing this
blend mode not only darkens the eyebrows and
eyelashes, it also darkens the entire photo, making it too
dark (as shown here), but we’ve got a way around that,
as you’ll see in the next step.
Tutorial
ADOBE PHOTOSHOP CS 2
Retouching Tips: Enhancing Eyes, Eyelashes, and More!
3. Temporarily hiding the Multiply effect. along the curves of each lash. Again, the eyebrows and
eyelids will appear too dark, but now that it’s all painted
Hold the Alt key (Windows) or the Option key (Mac
in, we can lower the intensity. To correct any mistakes,
OS), and then go to the Layers palette and click on the
switch the color to black and paint over areas you want
Layer Mask icon at the bottom of the palette. This adds
to undo.
a layer mask to this layer (the darkened Multiply layer)
and removes the visible darkening you added in the last
step. The photo should now look like it did when you
opened it.
5. Lowering the intensity of the retouch.
To lower the intensity of our darkening of the eyebrows
and eyelids, go to the Layers palette, and lower the
Opacity of this layer to around 35% (as shown). You’ll
have to use your own personal discretion as to how
much you’ll need to lower it, but as a general rule, this
is supposed to be a subtle retouching, so if you’re going
to err, err on the side of too little darkening.
4. Painting the effect back in.
Set your Foreground Color to white, switch to the Brush
tool, and choose a small soft-edged brush that’s about
the size of your subject’s eyebrows. Begin to paint over
the eyebrows with this brush. It will paint in the
eyebrows much too dark, but you’ll be able to fix that in
just a moment, so for now, just paint carefully over the
eyebrows. Also, paint right along the top of the lower
eyelid where it meets the eye, and right along the lower
edge of the top eyelid (as shown here). The subject
shown here has few visible eyelashes, but if your subject
does have visible eyelashes, zoom in close on the eyes,
choose a brush size that is the same approximate size as
the eyelashes (as small as 1-pixel) and paint (trace)
Tutorial
ADOBE PHOTOSHOP CS 3
Retouching Tips: Enhancing Eyes, Eyelashes, and More!
6. Brightening teeth. 8. Making those pearly whites sparkle.
To brighten her smile, start by going to the Layers Now, from the Edit menu in the Hue/Saturation dialog
palette and clicking on the Background Layer to make it box, choose Master (so you’re no longer editing just
the active layer. Then use the Lasso tool (or any yellow) and drag the Lightness slider to the right (as
selection tool you’re comfortable with) to put a shown) to brighten the teeth. When the teeth look good
selection around her teeth (as shown). Once selected, to you, click OK, and then go under the Select menu
we’ll need to soften the edges of the selection so our and choose Deselect.
retouch isn’t obvious, so go under the Select menu and
choose Feather. When the Feather dialog box appears,
enter 2 for low res images, 5 for high res, and click OK
to apply this edge softening.
9. Conclusion.
Here’s the final retouch (at right), with thicker fuller
eyebrows and eyelashes, and brighter, whiter teeth, and
7. Removing any yellowing.
the original photo shown at left.
In many cases, a person’s teeth (when viewed up close)
will have some amount of yellowing, but not to
worry—it’s simple to remove. Go under the Image
menu, under Adjustments, and choose Hue/Saturation.
When the Hue/Saturation dialog box appears, from the
Edit pop-up menu in the dialog box, choose Yellows.
Then, to remove the Yellowing, lower the Saturation
slider (as shown).
Adobe, the Adobe logo, and Photoshop are either registered trademarks or trademarks of Adobe Systems Incorporated in the United States and/or
other countries. Windows is either a registered trademark or trademark of Microsoft Corporation in the United States and/or other countries.
Macintosh is a trademark of Apple Computer, Inc., registered in the United States and other countries.
©2003 Adobe Systems Incorporated. All rights reserved.

